Introduction: The Importance of Sharp Knives in Your Kitchen
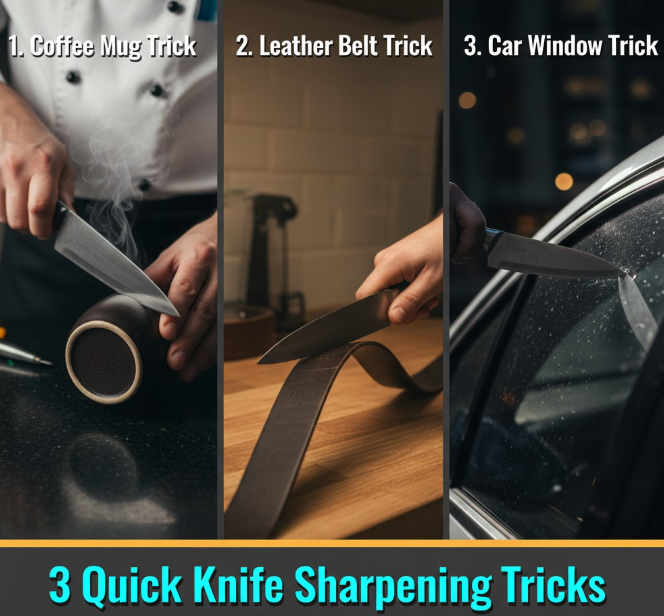
Not only are dull knives frustrating. It’s actually dangerous. When you must push harder to slice your food with a blunt blade, it increases the chance of slipping up and hurting yourself. That’s why it’s crucial to have the proper knife sharpening tools in your own kitchen.
Sharp knives make for an easier, more enjoyable time in the kitchen. They fly through tomatoes without your feeling as if you’ve squashed them, cut onions tidily enough that they don’t make you cry quite so much and allow for better control over your slices. It is a trick that professional chefs know, and now you do, too.
In this guide, we’ll take a closer look at seven crucial sharpening tools to have in your possession if you cook at home. Regardless of your experience as a cook, these tools are here to make sure your knives are at the top of their game. A sharp knife is your best friend, and you don’t need fancy equipment or any special training to take care of the edges in your own home.
The Distinction Between Sharpening and Honing
But before we start with the tools, let’s clear up a little confusion. Sharpening is not honing.
Sharpening your blade means grinding away metal to create a new edge. You should do this only when your knife has actually gone dull and no longer cuts well. Think of it as if you were reforming the blade.
Honing involves straightening the edge of your knife with less removal of metal. It’s as if you were trying to straighten a nail. You should maintain your knives regularly (that is actually between sharpening).
Most home cooks should sharpen their knives every few months, depending on how often they cook. Honing needs to be done a lot more, every time if you can!
1. Whetstone: The Traditional Choice
What Makes Whetstones Special
One of the most effective and oldest methods for sharpening knives is with a whetstone, also called a sharpening stone. Learn to use them, lest you look like a fool in front of the professional chefs and extreme home cooks in your life.
Whetstones are available in various grits. Lower numbers, like 400 or 1000 grit, are more coarse and take off more metal. Higher numbers like 3000 and 6000 grit do a final fine polish to the edge. The average home cook also requires a minimum of two grits: one medium (1000 grit) and one fine (3000-6000 grit).
How to Use a Whetstone
Practicing with a whetstone takes time, but it is worth doing. Soak the stone in water for 10-15 minutes first. Place it on a wet towel so it won’t slip.
Place your knife blade at a 15-20 degree angle to the stone. Move the blade over the stone, from heel to tip. Do it on either side of the blade while keeping consistency to your angle.
Work first with the coarse side to reshape an edge, then run the edge over the fine side for polishing. Once you get the hang of it, it takes about 10 to 15 minutes per knife, all told.
Pros and Cons
Pros:
- Puts you in charge of how the sharpening is done
- Creates an extremely sharp edge
- With care, they can last for years
- Works on any type of knife
Cons:
- Requires practice and patience
- It is time consuming more than other ways
- Needs to be soaked before use
- Can be messy with water or oil
2. Electric Knife Sharpener: Fast and Easy
Why Electric Sharpeners Are Popular
Electric knife sharpeners are one of the most convenient home chef tools. They do the work: next to no skill or effort needed.
The machines have wheels on them that move by their own motor and they contain abrasive materials. It’s quite simple: You pull your knife through the slots, and the machine does the rest. Most models feature more than one stage of sharpening and honing.
Choosing the Right Electric Sharpener
A minimum of two stages is ideal in a model. First slot should be used to shape blade edge, second one – to polish and refine the edge. And some top-tier models have three stages for an even better finish.
Decent electric sharpeners have guides that hold your knife at the right angle. This takes the guesswork out and ensures you get consistent results every time.
From $50 to $200. The midrange models, those around $100, are best for most home kitchens.
Best Practices
Never try to hurry things up with an electric sharpener. Drag the knife slowly but consistently through. Just press lightly, and let the action of the machine do the work.
You don’t want to sharpen your knives too frequently. That’s enough home cooking, and then some, a couple of times a month. (Something worth noting: Over-sharpening can reduce the life of your blades.)
Clean the sharpener with regularity, in order to avoid build-up of metal filings. This is one way to keep it working right and make it last longer.
3. Manual Pull-Through Sharpener: The Affordable Choice
Simple and Effective
Great for use in the home kitchen or outdoor. They’re ideal for beginners who might want sharp knives without spending a lot of money.
Those tools feature V-shaped slots filled with sharpening compounds. You draw your knife through the slot a few times, and the abrasives work to sharpen both sides of the blade simultaneously.
How They Work
Dual slots are common to most manual sharpeners. The coarse slot helps to reshape dull blades, and the fine slot smooths edge. A third slot, for ceramic honing, is also found on some models.
To use one, set the sharpener on a flat surface. You press it down with one hand and pull the blade through from the other. Keep applying the brush strokes to get a good base and then brush from the base right through to the tip.
Limitations to Consider
Manual sharpeners are nice, but there are some downsides. They remove more metal than is necessary, which might actually shorten the life of your knife. They also function best on Western-style knives with 20-degree angles.
Japanese knives with the 15-degree edges may not be sharpened as effectively by these products. The angle is fixed and cannot be adjusted.
For lighter duty use on everyday knives, however, a manual sharpener is a more reasonable choice. They run $15 to $40.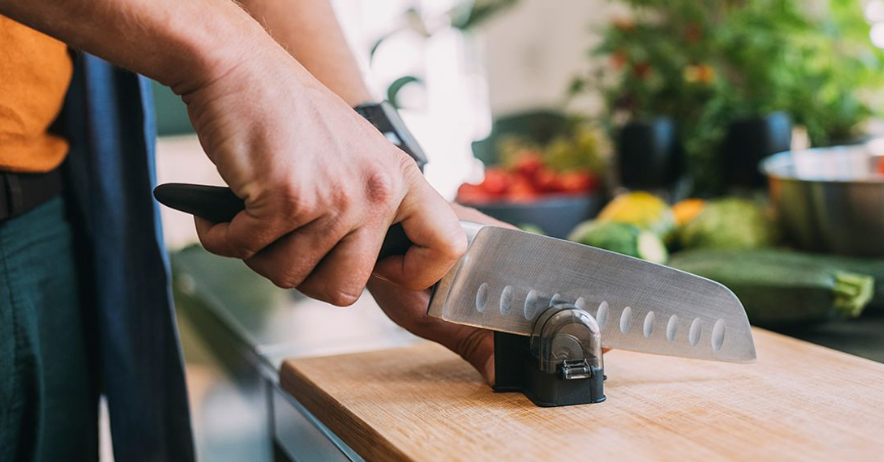
4. Honing Steel: Daily Maintenance
Not a Sharpener, But Essential
Surprise: honing steels don’t actually sharpen your knives. They’re maintenance tools, and they keep sharp knives sharp by straightening out the edge.
Think of your knife edge here as a ragged row of tiny teeth. These teeth go out of whack through use of your knife. Without consuming metal, it straightens them back up with a honing steel.
Types of Honing Steels
There are three main types:
- Traditional steel rods: The original, constructed from hard steel with grooves
- Ceramic rods: Smooth and less aggressive, which are beginner-friendly
- Diamond rods: Stronger but, again, will do some light sharpening
For most home cooks, a ceramic or classic steel rod is just fine. They’re some of the most critical knife sharpening tools because you use them so much.
Proper Honing Technique
Stand the steel on end with its tip placed on a cutting board. Hold the base of your knife against the top of the steel at a 15-20 degree angle.
Sweep the knife back and down over the steel, from heel to tip. The blade should only graze the steel. Do this 5-10 times on each side.
Employ your honing steel every time before you cook to keep the good stuff going. This easy practice will keep your knives in tip-top shape between sharpenings.
5. Sharpening System: Professional Results at Home
What Are Sharpening Systems
Sharpening systems are guided knife sharpening tools that help you keep the perfect angle. They’re the whetstones on training wheels.
They typically have a clamp to secure your knife, guide rods for setting the angle and sharpening stones of differing grit. Some models are built with diamond plates rather than stones.
Benefits for Home Chefs
The main advantage is consistency. The guide makes certain you keep the precise angle during every stroke. This results in pro-level edges, those that would take years to learn how to do freehand.
Several have adjustable guide settings so you can sharpen at different angles for different knives. You also can do 15 degrees (for Japanese knives) and 20 degrees (for Western knives) with the same system.
Investment Worth Making
Quality sharpening systems range from $100 to $300. Although that can seem pricey, they are really the kind of thing you buy once and have for decades, capable of sharpening any knife in your collection.
Well-known brands are such as Lansky, Work Sharp and Spyderco. There are a few differentiating features between them, but they all work well.
If you have expensive knives or simply want the sharpest edge, then a sharpening system is worth it, no question.
6. Diamond Sharpening Stone: Quick and Durable
Why Diamonds Work Better
A diamond plate is a flat metal surface that is used to make things sharp. They’re some of the most reliable knife sharpeners on the market today.
No natural substance is harder than a diamond, which means they slice through steel like butter. This means that quicker sharpening with less effort. They never have to be flattened either, as whetstones do over time.
Using Diamond Plates
The process itself is similar to that of using a whetstone. Place the plate on a firm surface and angle a knife as you should. With a steady force, push or pull the blade over the plate.
Diamond plates usually don’t need any water or oil, but some people like to use a little bit of water for cleaning away metal particles. This also makes them cleaner and easier to use than natural stones.
They’re available in various grit levels, much like whetstones. A medium (400-600) and fine (1000+) grit combination is all you need to get just about anything sharp.
Longevity and Care
Diamond plates are more durable than other types of sharpening tool. They can sharpen knives for 10-20 years or even longer if maintained correctly.
Simply wash them with soap and water after every use. Avoid chemicals and abrasives. Keep them flat, in a dry place.
You should be able to get one for $40-$100. Double-side plates with two different grit sizes offer the most bang for your buck.
7. Ceramic Sharpening Rod: For a Smooth and Precise Edge
The Gentle Giant
Hard ceramic rods are smooth knife sharpening tools that work well for maintenance and honing of the edge, but they won’t take off much metal. They shave off a small amount of metal while honing the edge.
These are great for honing knives that are already sharp. They’re less aggressive than other systems, so they are best for finer steel blades or serrated knives.
Ideal for Certain Knives
Ceramic rods are particularly good for hard steel Japanese knives. The softer action isn’t going to ruin their thin, sharp edges.
Ceramic is also very effective for serrated knives. The surface is smooth in relation to the serrations so as not to physically damage them. Serrated edges confuse just about every other sharpening tool.
How to Use Them
It’s like using a honing steel, sort of. Angle the rod and draw your knife across it smoothly. Apply relatively light pressure and let the ceramic do the work.
Handheld ceramic rods as well as ones that come mounted on a base for simplified use are available. Go by what you like and have room for.
Ceramic rods generally cost anywhere from $20 to $60. They’re delicate, and drop one and you risk breaking them.
Comparing Your Options: Which Tool is Right for You?
| Type of Tool | Best For | Skill Level | Price Range | Speed |
|---|---|---|---|---|
| Whetstone | Sharpest edge | Intermediate | $30-$100 | Slow |
| Electric Sharpener | Convenience | Beginner | $50-$200 | Fast |
| Manual Pull-Through | Quick fixes | Beginner | $15-$40 | Fast |
| Honing Steel | Daily maintenance | All levels | $15-$50 | Very fast |
| Sharpening System | Precise angle control | Beginner-intermediate | $100-$300 | Moderate |
| Diamond Plate | Efficiency | Intermediate | $40-$100 | Moderate |
| Ceramic Rod | Gentle maintenance | All levels | $20-$60 | Fast |
Building Your Sharpening Kit
You don’t have to invest in all 7 knife sharpening tools, right off the bat. Start with these basics:
For beginners: Hone with a honing steel, and reserve manual pull-through sharpener for polishing only. This combo costs less than $50 and can take care of most kitchen duties.
For the serious home cook: Consider a whetstone or sharpening system. With practice, these tools allow you to produce professional results.
For convenience: An electric sharpener paired with a honing steel is the way to go if you’re willing to spend some money for the surest, cleanest results.
You can add more specialized tools as your skills and interest develop. Many avid home cooks wind up with several forms of sharpening for various situations.
If you’re looking for professional knife sharpening services in your area, expert sharpeners can help maintain your knives to perfection while you build your skills at home.
Tips for Maintaining Sharp Knives
Simply having the tools is only a starting point. These habits will keep your knives sharper, longer:
Use cutting boards properly. Wood and plastic are kind to knife edges. Knives are dulled by glass, granite and ceramic cutting boards.
Hand wash your knives. Dishwashers are rough on the blade and handle. Wash knives by hand and dry promptly.
Store knives correctly. Store in a knife block, on a magnetic strip, or with blade guards. Knives should not be stored on edge in a drawer.
Cut on appropriate surfaces. Don’t scrape on plates or countertops. Blades dull rapidly against these hard surfaces.
Hone regularly. When you do cook, hone your knife beforehand. This simple practice makes all the difference.
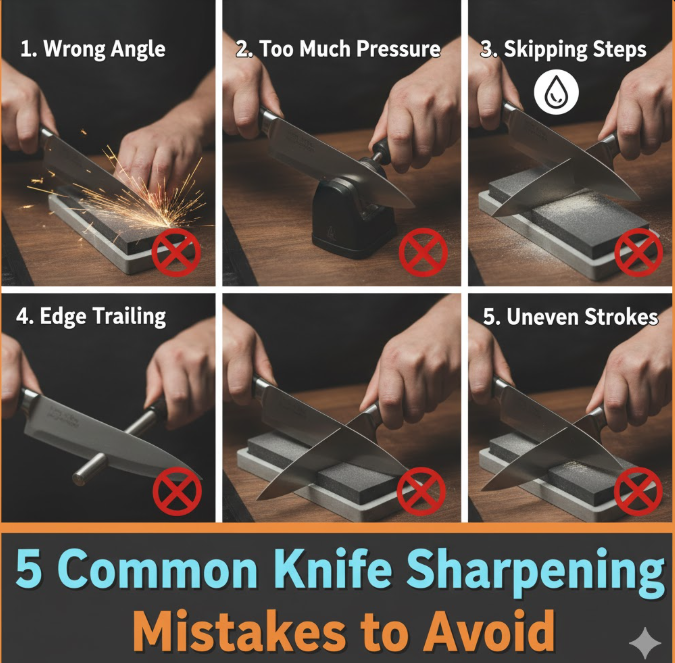
Common Sharpening Mistakes to Avoid
Even if you have good knife sharpening equipment, there are ways to mess this process up and wreck your knives:
Using the wrong angle. Most Western knives angle the blade at 20 degrees and most Japanese knives are built at 15 degrees. Check your knife’s specifications.
Applying too much pressure. Let the sharpening tool do its work. Heavy pressure will not make it sharpen more quickly and can damage the blade.
Sharpening too often. Over-sharpening is premature wearing out of your knife. Every couple of months ought to do it.
Neglecting the entire edge. Just be sure that you sharpen from the heel of the blade to the tip. Partial sharpening creates uneven edges.
Skipping honing. We sharpen, but we don’t hone. Regular honing increases length of time between sharpenings.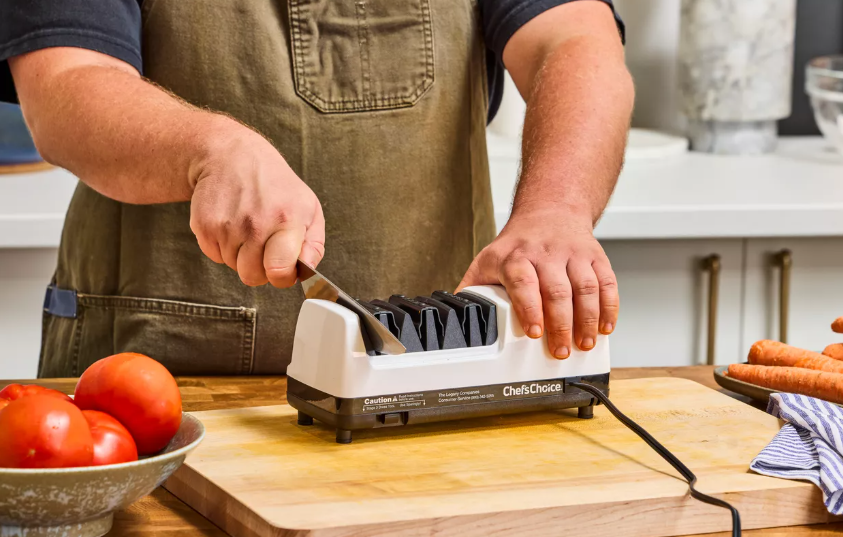
Frequently Asked Questions
How frequently should I get my kitchen knives sharpened?
For home use, you should sharpen your knives every 2-4 months depending on how often you cook at home. Professionals sharpen weekly, but the rest of us use our knives less. Hone your knife with each use to keep the edge sharp.
Am I able to use the same tool on all my knives?
There are knife sharpening tools that can do multiple knife types, but the angles matter. Most Western knives come with 20-degree angles, while most Japanese knives are set to 15 degrees. Serrated knives also require a special ceramic or tapered sharpener.
Are cheap sharpeners worth buying?
Budget sharpeners pull excessive metal, but do not produce the sharpest edge. Spending $50-100 for a good sharpener quickly helps amortize itself through greater effectiveness and longer knife life.
When do I know if my knife needs sharpening or just honing?
Try the paper test. Take one of your knives and a piece of paper, and cut the paper. It requires sharpening if the knife catches or tears rather than cutting cleanly through the paper. If it cuts but with less smoothness than you’re used to, try honing first.
What is the best sharpening tool for a beginner?
Begin with a honing steel and either a manual pull-through sharpener or an electric sharpener. These are no-skill-needed tools that provide demanding performance as you are initiated to fine knife care.
Is it possible to mess up my knife by sharpening it improperly?
Yes, using a wrong technique can ruin your knives. Using the incorrect angle, too much force, or sharpening more than necessary can weaken the blade or result in irregular edges. Use manufacturer instructions and practice on less expensive knives. For more guidance on proper technique, check out America’s Test Kitchen knife sharpening guide.
Conclusion: Sharp Knives, Better Cooking
High quality knife sharpening tools make your kitchen life more enjoyable. Knives that are sharp are not only safer but cut cleaner, faster and as such make the preparation of food more enjoyable and less frustrating.
You don’t require every tool on this list to keep your knives sharp. That depends on your level of cooking, budget and other factors. Even a cheap honing steel and rudimentary sharpener can make a universe of difference in your kitchen game.
Keep in mind that knife care is a learned skill, and only gets better. If your first efforts are less than perfect, keep up the good work! Watch tutorials and don’t rush it, be patient with yourself!
Good cooking begins with sharp knives. They give you more control and make your knife skills better while helping you get food prepared more safely. It is a maxim of professional chefs, one that you can now use to maintain your knives professionally at home.
Begin with one or two of the tools in this guide, and add to your arsenal over time. Your knives — and your cooking — will thank you for it.