If you cook at home and don’t know how to sharpen a kitchen knife, you’re really missing out on the excitement that is keeping an edge sharp; however, unlike most other hype phrases like “sibling rivalry” or “joy of painting” this is one form of enthusiasm with real merit. It’s not something even beginners should run from.
Introduction
Any home cook knows the annoyance of trying to cut a tomato with a dull knife. Sharpening a kitchen knife at home is one of the most important skills you can learn on your path to becoming a great home cook. “A dull knife is more dangerous than a sharp one.” And there is truth at the bottom of this typical line from any meat-faced man just back from an elk hunt or salmon fishing. “When your knife has been sharpened, you’re exerting less pressure to push it through the food,” said Sarah Jay Smith, head of housekeeping at the Standard group hotels in New York City, making it less likely that the knife will slide and cause an accident.
These knives never need anything more than ordinary kitchen care. Using a few simple tools and the following technique, you can restore dull blades to perfect sharpness. This tutorial will guide you through everything you need to know about sharpening kitchen knives at home, from selecting the right tools to learning the proper techniques.
It’s a nice feeling to have sharp knives, since it makes cooking easier, faster and more enjoyable whether you are chopping vegetables, carving meat or slicing fragile herbs. Now, let’s learn the basic steps to turn your lifeless blades into precision cutters.
Why Sharp Knives Are Important in Your Kitchen
A good cook begins with a razor-sharp knife. The smoother your knife moves through foods, the more control you have over what pieces of food will be shaped. Those will be more uniform pieces that cook evenly and look professional on the plate.
Dull knives are dangerous because too much force is needed. When you exert force pushing down to separate something, the blade is apt to slip and glance off any surface it encounters — including your hand. Sharp knives require less pressure resulting in more control and therefore a cut that is uniform.
The blades in your ingredient favors this too. And because a dull knife crushes and tears at food fibers, more cells release their moisture (light juices cutting through the air), making vegetables like tomatoes and onions mushy. Fine blades make clean cuts, which means the texture and flavor of your food will stay intact.
Signs Your Knife Needs Sharpening
Before you find out how to sharpen a kitchen knife at home, first you need to understand when it is time for sharpening. Here are the telltale signs:
The Tomato Test: See if you can slice a ripe tomato. If the knife slips off the skin rather than cleanly slice through, it’s time to hone.
The Paper Test: Hold the edge of the paper up and stab down to try to cut through it. If a blade is sharp, the cut will be clean and otherwise if it is dull, it will also tear or not cut at all.
Visual Inspection: Inspect the edge of your knife under a good light. If you see light reflecting off the edge, then that means it’s rounded over and it needs to be sharpened. A truly sharp edge is so thin, it can reflect no light.
Cutting Feel: When you are cutting onions or carrots, do the vegetables seem to melt away as your knife glides through them or do you feel the need to saw back and forth? Sawing motion means you have a dull blade.
What You Need to Sharpen Knives
There are several types of tools that you can use. Both have their own pros/cons and learning curves.
Whetstones (Sharpening Stones)
Whetstones are the classic option for sharpening knives. They’re available in different grit numbers — lower (400-1000) takes away more metal for very dull knives; higher (3000-8000) produce a polished edge that’s razor sharp.
For most home cooks, two stones are essential: a 1000-grit for sharpening and a 6000-grit for polishing. Whetstones offer the most control and create the sharpest edges, but you’ll need to practice to get good at using them.
Sharpening Rods (Honing Steels)
A lot of people mix up honing and sharpening. Once again, a honing rod does not sharpen your knife (it hones the edge). When you actually wield your knife, the thin edge can flex microscopically to one side. Honing straightens it back up.
You can hone it every few uses to keep the knife sharp between sharpenings. This extends the period between true sharpening.
Pull-Through Sharpeners
They are ready-made jigs that can be used with little skill as they have pre-set angles. Basically, you pull your knife through the slots a few times. They are fast and easy but tend to remove more metal than necessary and cannot produce edges as sharp as whetstones.
Electric Sharpeners
Electric sharpeners are the quickest and easiest to use, but need almost no skill. They are pricey, but they’d be great for those of us who can’t be bothered to learn traditional knife skills and just want some sharp knives. But they waste metal quickly and may shorten your knife’s life.
The Best Way: With a Whetstone
Teaching yourself how to sharpen a kitchen knife at home with a whetstone will provide you the best results. Here’s the step-by-step process:
Step 1: Prepare Your Whetstone
Many whetstones require a 10 to 15 minute soak in water prior to use. Check your stone’s instructions — some of the newer stones only require a fast splash of water on the surface.
Put your wet stone on a wet towel to prevent it from moving. Ensure your work surface is sturdy and at an appropriate height.
Step 2: Find the Right Angle
Success in sharpening comes from holding a consistent angle. For most kitchen knives, a 15-20 degree angle works best. Japanese knives are often 15 degrees; Western, about 20.
Another way to picture 20 degrees: Picture a matchbook under the spine of your knife. That’s roughly the right angle. Others use a stack of coins under the blade spine to keep things consistent.
Step 3: Sharpen One Side
Put your knife on the stone at whatever angle you’re using. With light to medium pressure, push the blade across the stone as though you’re trying to slice a thin layer off the top. Work from heel (nearest the handle) towards tip in one continuous motion.
Contact the entire edge of the blade with the stone throughout each stroke. Do this movement 10-15 times on the same side.
Step 4: Check for the Burr
Stroke it a few times, then run your finger gently along the edge from the spine out to the edge on that side, where you haven’t sharpened yet. You should be able to feel a slight rough edge — what’s called a burr. That burr lets you know that you’ve ground one side cleanly and created a new edge.
You should feel a burr, and if you don’t, continue sharpening that side until one forms.
Step 5: Sharpen the Other Edge
Turn your knife over and repeat the process on the other side. Do the same number of strokes and at the same angle. You’re establishing a burr on this side and you’re removing it on that first side.
Step 6: Polish the Edge
Move on to your higher-grit stone (if you have one) and continue the process with less pressure. This hones the edge and shears away any remaining burr. Switch sides more often — 5 strokes on each side, then 3, then 1.
Step 7: Test Your Knife
Use the paper test to check your work. A knife that is well maintained should cut through paper easily. You can also do the tomato test — your blade should penetrate the skin just by the weight of the knife, no pressure necessary.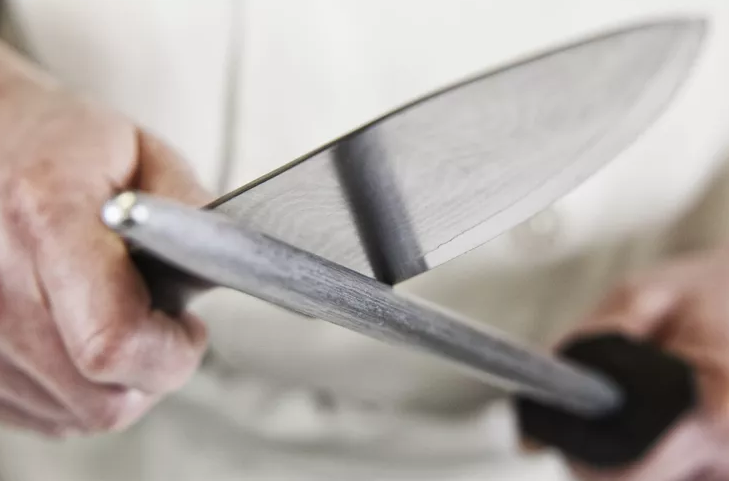
Quick Sharpening with Pull-Through Sharpeners
If you don’t have time or simply want an easy way to sharpen your knife at home, pull-through devices are a quick and convenient alternative on how to sharpen a kitchen knife.
Put the sharpener on a solid surface. Place your knife in the coarse slot (if your sharpener has multiple stages) and pull it from heel to tip with slight pressure. Do this 3-5 times.
Then use the fine slot the same for another 3-5 passes. This polishes the edge.
This method won’t yield a blade as sharp as one on a whetstone, but it’s fine for everyday kitchen tasks, and takes less than one minute.
Keeping Your Edge With a Honing Rod
Can be used as an everyday maintenance tool. Here’s how to use a honing rod properly:
Stand the rod up vertically with a tip on the cutting board. Hold the knife on the rod laying against at a 15-20 degree angle close to the top of it. Pull the knife down and across from heel to tip. The action should be fluid and slow.
Switch sides with every stroke — first right, then left. Do 5-10 strokes per side. You’ll hear a faint ring as the metal makes contact.
Hone your knife every 2-3 uses to keep it sharp. This easy 30-second technique will help keep your blades cutting clean for weeks between actual sharpenings.
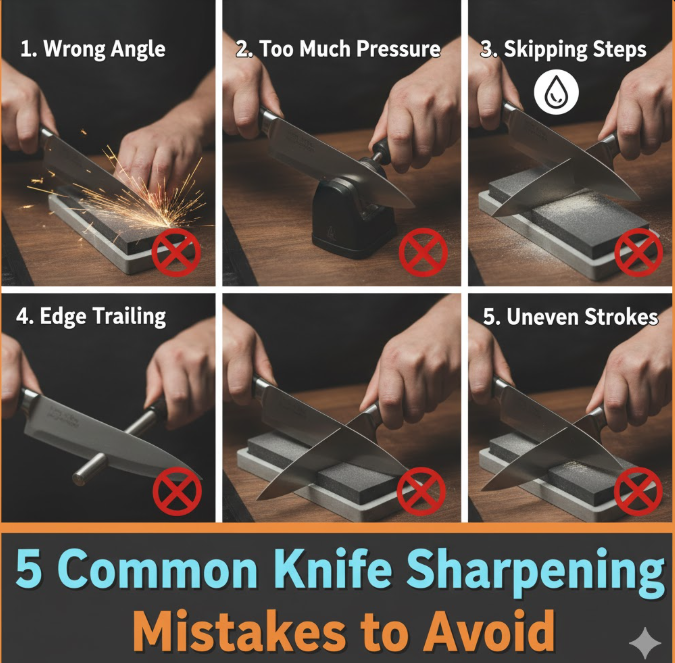
Common Mistakes to Avoid
Here are common mistakes that many beginners make when they first learn how to sharpen a kitchen knife at home:
Applying Inconsistent Angles: The chosen angle is far less important than maintaining a consistent one. If you keep changing angles, you get a rounded edge instead of a sharp point.
Too Much Pressure: Let the stone do its job. Strong pressure doesn’t sharpen faster — it only wears out your stone and puts an inconsistent edge on it.
Not Sharpening the Entire Edge: Be sure to focus on the heel and tip of your knife. These regions require as many strokes as the mid-section.
Sharpening Too Much: You only need to sharpen your knives every couple of months with typical use. Hone consistently, but save sharpening for when the knife needs it.
Ignoring Safety: Always cut away from your body when sharpening. Keep your fingers away from the edge of the blade and concentrate on the job.
How Often You Should Really Sharpen Your Knives
How often you cook and what you’re cutting will determine how frequently that needs to happen. Home cooks who cook everyday may need to sharpen every 2-3 months. If you really only cook occasionally, twice a year may be sufficient.
Hard foods, such as squash and sweet potatoes, can cause your blade to grow dull more quickly than soft ingredients. Cutting on glass, ceramic or stone surfaces also dulls edges fast — always use wooden or plastic cutting boards.
Professional cooks sharpen the knives they use most often — some of which are made of carbon steel and require frequent honing — weekly or even daily. But in home kitchens, honing regularly and sharpening a few times a year will maintain knives that are in great shape.
Maintain Your Knives in Between Sharpening
With the appropriate care, sharpening intervals are extended by:
Handwashing is Always Best: Dishwashers destroy knife blades and handles. Hand wash knives with mild dish soap. Don’t let the knife sit in water for long time.
Cut on Proper Boards: Wood and soft plastic keep your edges. Avoid glass, marble, granite and ceramic boards.
Store Knives Safely: A knife block, magnetic strip or blade guards will serve you well. Throwing knives in a drawer is both edge-damaging and hazardous.
Don’t Use Knives for Non-Cutting: Kitchen knives are not the right tool for opening cans, cutting wire, or forcing something open. These things make holes in the blade.
Comparison of Sharpening Methods
| Method | Difficulty | Time Required | Edge Quality | Cost | Best For |
|---|---|---|---|---|---|
| Whetstone | High | 15-20 minutes | Excellent | $30-100 | Enthusiasts who seek out the sharpest edges |
| Pull-Through | Low | 1-2 minutes | Good | $15-50 | Busy cooks who require speed and convenience |
| Electric | Very Low | 2-3 minutes | Very Good | $50-200 | Those who value time over technique |
| Honing Rod | Medium | 30 seconds | Maintains existing edge only | $20-60 | Daily upkeep between sharpenings |
| Professional Service | None | Varies | Excellent | $5-10 per knife | Those avoiding at-home sharpening |
How to Sharpen Each Type of Knife
Japanese Knives: This type of knife is harder and more brittle than its Western counterpart. Go lighter on the pressure and follow a 15-degree angle. Many Japanese knives are single-beveled, so you only sharpen one side.
Serrated Knives: These need specialty sharpening rods or services by a professional. Do not try to sharpen them with regular whetstones unless you have some experience.
Ceramic Knives: These require diamond stones for sharpening. Regular whetstones won’t work. Ceramic is fragile, so it’s especially important to keep the angle consistent.
Stainless Steel vs. Carbon Steel: Carbon steel is easier to sharpen and it cuts better, but it’s more high maintenance in terms of rust prevention. Stainless steel is more forgiving but a little harder to get quite as sharp.
Frequently Asked Questions
How do I know when my knife is sharp enough?
Do the paper test: A sharp knife will cut a piece of paper clean with no tearing. You could also try it on a tomato. The skin should cut away easily with little pressure from the blade.
Is it possible to make a knife too sharp?
Yes. When you sharpen your knife, it is literally asking the metal to lay down because less metal equals a sharp edge. Sharpen only when performance declines, not at predetermined intervals.
How are honing and sharpening different?
Honing realigns the edge but doesn’t take any material off. Sharpening involves the removal of metal to form a new edge. Honing is maintenance; sharpening is restoration.
Do you really get what you pay for with whetstones?
Higher-quality stones provide a more even cut that lasts longer, though beginner’s budget stones will work just fine. Buy an inexpensive combination stone to start with and if you’re loving it, upgrade yourself later.
How long does a knife stay sharp if it is sharpened?
Between care and periodic honing, a knife shouldn’t need to be sharpened more than once every 2-3 months of daily use. Professionals may have to sharpen more often.
Is it ok to use whetstone with oil and not water?
Unless your stone is made specifically for oil. Water stones require water, and oil stones should be oiled. Your stone can be destroyed by using the wrong lubricant.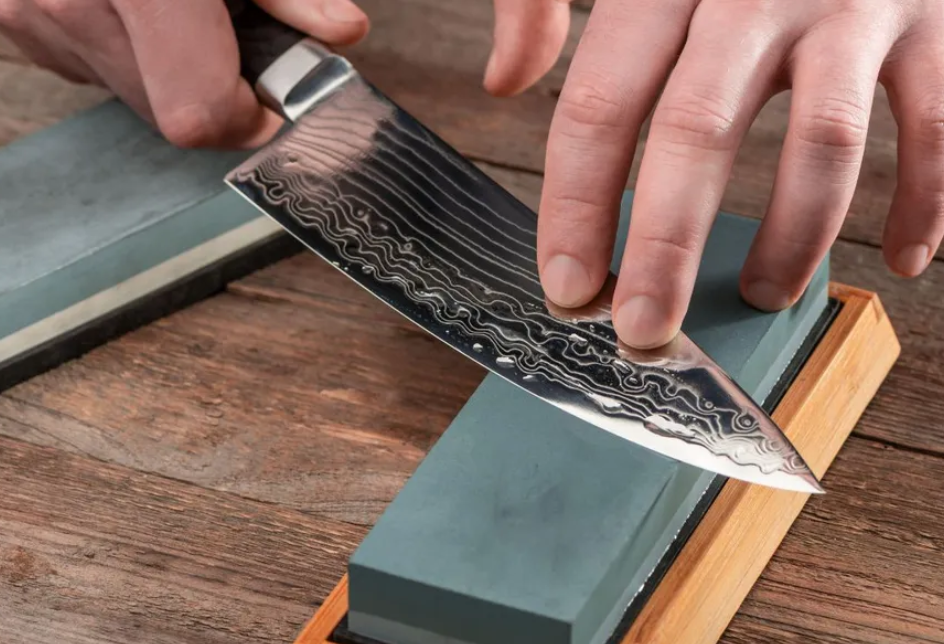
Conclusion
Learn how to sharpen a kitchen knife at home, and you’ll transform the way you cook. Sharp knives mean faster, safer, more enjoyable prep work. And while it requires skill, even novices can reach chef-like sharpness using basic whetstones or pull-through sharpeners.
Just begin with one approach and work at it consistently. Whether you opt for the traditional whetstones for ultimate sharpness or easy pull-through sharpeners for speed, it’s worth just taking a little time to keep your knives in good nick all year round. For professional knife sharpening services, you can also consider expert help to maintain your blades at peak performance. Pair regular honing with occasional sharpening to maintain your blades.
And remember that sharp knives are an investment in your cooking prowess. It’s about how you take care of your knives, everything from washing to storage, and the cutting boards. Armed with these tricks, you’ll never have to wield a dull knife again. Your ingredients will thank you, your hands will and so will your cooking when you’ve got razor-sharp edges that you sharpen yourself.
For more detailed guidance on knife sharpening techniques and equipment, you can visit Serious Eats’ comprehensive knife skills guide.