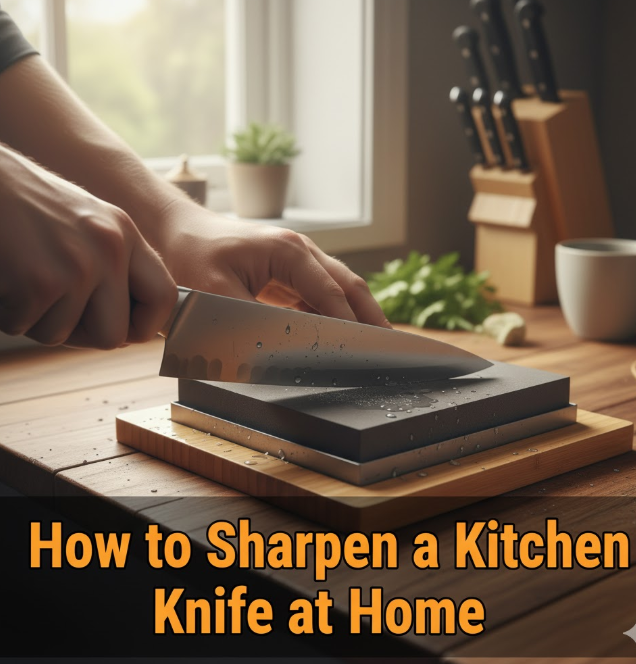
Why Sharp Knives Matter in Your Kitchen
It’s the bane of every home cook: battling a dull knife. You push harder, the blade skitters, and suddenly what should be a routine task has turned into a dangerous, time-consuming one. The good news? There’s no need for expensive equipment or hours and hours of free time to keep your knives sharp. These knife sharpening tricks will forever change how you operate in the kitchen.
You are actually safer with a sharp knife than a dull one. The less strain you need to apply in using a kitchen knife, the better control it provides you. That translates to less splattering and faster meal prep. Besides, properly sharpened knives maintain the best texture and look to your ingredients. Nobody likes tomatoes that look squished rather than sliced.
Some busy cooks tune out when the topic of sharpening comes up; they believe it’s complicated or requires special skills. The truth is much simpler. Knives, with a few knife sharpening hacks, can be kept sharp in just minutes. These techniques utilize items you likely have on hand at home.
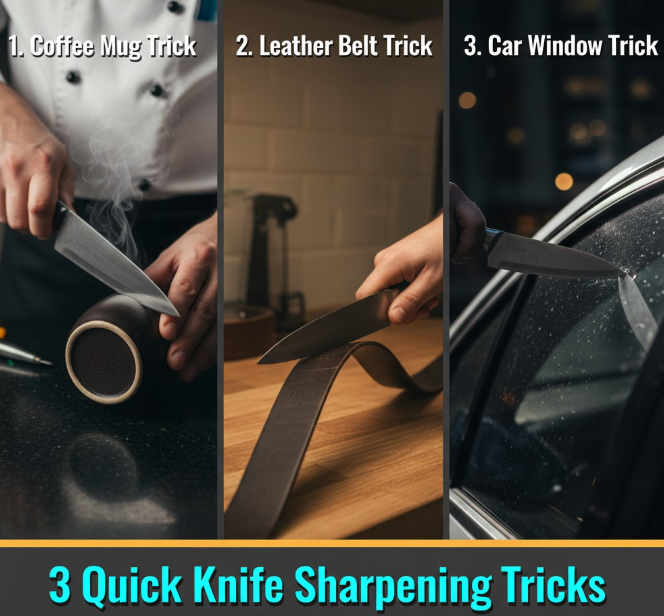
The Coffee Mug Trick: Your Kitchen’s Sharpest Tool
How This Simple Hack Works
Examine the underside of every ceramic coffee mug. See that rough, unglazed ring? That’s your built-in sharpening tool. The ceramic is stiff enough to re-align and sharpen your edge. It takes no extra equipment, and it’s a fine choice.
Place your mug upside down on someplace solid. Hold it firmly with one hand. Grab your dull knife, and hold the blade against the coarse ceramic ring at a 20-degree angle. This is an important angle when it comes to getting the edge sharpened.
Step-by-Step Process
Beginning at the bottom of your knife blade, close to its handle. Drag the knife towards you as it glides along the ceramic. Apply light to medium pressure. You will hear a grinding noise as the metal touches ceramic.
You should be able to make 5-8 smooth strokes on one side of the blade. Then turn the knife over and do the same number of strokes on the other side. Angle must be constant at all stages. Once you’ve sharpened it, try running your knife across a piece of paper. A sharp blade will slice through smoothly with no shredding.
This works well for light signs of dulling. If it’s been months since your knife was last sharpened, you may need more strokes or a different technique.
Safety Tips for Mug Sharpening
And always sharpen away from your body. Keep your fingers well away from where the blade will travel. You’ll also want to use a sturdy mug with a firm base that doesn’t tend to tip over. Place it on a non-slippery surface like a moist towel or cutting board.
Never rush this process. Slow movements are safer and often more effective than fast ones. If your mug begins slipping, slow down and adjust it.
The Leather Belt: How to Get Pro Style at Home
Why Leather is Good for Your Knives
Leather strops have been used by barbers for centuries to keep a razor’s edge sharp. The same goes for kitchen knives. Leather doesn’t even, strictly speaking, sharpen a blade in the traditional sense. Rather, it actually polishes the tiny teeth on the cutting edge.
This is one of the easiest knife-sharpening hacks you can try. It doesn’t eat away at your blades as much, so you don’t have to replace your knives. Stropping often in between major sharpenings maintains your edges at their best.
Setting Up Your Belt Strop
Locate an old leather belt with no holes or embellishment on the smooth side. Just what you’re looking for, that unadorned leather surface. Hang belt securely from a hook or doorknob. Tighten it so that it doesn’t flop around when you use force.
Or you could lay the belt on a table, with one end secured in place and grip at it. The hanging technique is more controlled and offers a better-grasping angle, but both methods suffice.
The Stropping Motion
Lay your knife on a low angle to the leather — 15 degrees or so. Begin with the blade’s heel touching the leather. Pull the knife towards you as well as across the belt so you are allowing the whole edge to touch. This is referred to as a “trailing” action, since the cutting edge trails behind it.
Raise the knife, turning it over, and do the same on the other side. Do 10-15 passes per side. You pull the blade away from the cutting edge, unlike with the ceramic approach. Forcing the edge in can wreck both your knife and the leather.
Your blade should be noticeably sharper after stropping. This is a great method if you only have time for some quick touching-up before cooking.
The Aluminum Foil Remedy: Quick and Simple
Understanding This Surprising Method
Aluminum foil may not be able to notch a blade like a whetstone, but it can smooth away any tiny dents or imperfections that are making the cut blunt. When foil is folded over, layers of the metal rub against each other and function like super fine sandpaper. While you slit the foil, it shaves off little bits of oxidation and burrs on your blade edge.
It’s one of the fastest knife sharpening methods for use in emergency. It won’t change a completely dull knife to be razor sharp, but it definitely improves the cutting effectiveness in less than a minute.
The Folding and Cutting Process
Pull off a sheet of aluminum foil, about 12 inches long. Fold it in half lengthwise. Then fold it in half again. Continue folding until, when you lift the strip, it feels thick and sturdy — about 8 to 10 layers in all.
Grasp both ends of the folded foil strip with your hands. Grab that knife, and slice straight through the foil. Don’t just chop straight down. Move with slices like you’re slicing through a tough vegetable. Cut 15-20 slits through the foil.
The foil will rip and tear. That’s normal and expected. Every slice further straightens and polishes your knife edge.
When to Use This Method
The aluminum foil trick is ideal for keeping knives relatively sharp. It’s wonderful when you’re halfway through cooking and realize your knife needs touching up. It’s also a great way to sharpen your serrated knives, which can’t be sharpened with conventional tools.
Employ this tip in between your more complete sharpenings. It’s perhaps more of a temporary fix than a deep solution. Pair it with other hacks for how to sharpen a knife for the best outcome.
The Ceramic Plate Edge: Another One of the Kitchen Essentials
Finding the Right Surface
Most ceramic plates also have an unglazed rim on the bottom edge. Yes, this unglazed ceramic ring is a sharpening tool! It’s essentially the coffee mug technique, but on a broader scale.
Turn over any ceramic plate, and observe the bottom rim. If it feels rough, you can use it to sharpen. Dinner plates are often more stable than smaller dishes, and thus work better.
Sharpening Technique for Plates
Put the plate upside down on a wet towel so it doesn’t slip. Keep the plate still with your non-knife hand. Place your blade at about 20 degrees against the unpolished ceramic edge.
Stroke the knife across the ceramic edge from heel to tip. Apply a little bit of pressure and keep your angle. Do 5-10 strokes on either side of the blade. This way allows you to work on longer knives more easily than the mug method, as you have much more working area.
Comparing Plates to Mugs
Both ceramic surfaces operate in the same way. Plates provide more stability and a larger surface area that some individuals find easier to manage. Mugs are more travel friendly and can be used anywhere. Experiment with both and see which you prefer.
Comparing All Four Methods
| Method | Time | Difficulty Level | Usability | Equipment Needed |
|---|---|---|---|---|
| Coffee mug | 2-3 minutes | Easy | Quick touch-ups | Ceramic mug |
| Leather belt | 3-5 minutes | Moderate | Regular maintenance | Old leather belt |
| Aluminum foil | 1-2 minutes | Very easy | Emergency fixes | Aluminum foil |
| Ceramic plate | 2-3 minutes | Easy | All-purpose sharpening | Ceramic plate |
You’ll want to use these knife sharpening hacks in your kitchen each and every time. The ideal is to use several of these in combination as your time and desire permit, but really there isn’t a wrong way to approach it. For more comprehensive knife sharpening services and professional guidance, expert help is always available when you need it.
Making Your Sharpening Routine Stick
Creating a Simple Schedule
Home cooks on the fly don’t need systems that stress them out. If you’re sharp, you strop your knives on a leather belt once a week. Employ the ceramic techniques at the end of each month for a more aggressive sharpening. Make sure you have aluminum foil on hand for fast fixes during meal prep.
Make a note on your calendar or in your phone. Simply put: Sharp knives make your time in the kitchen so much better that the few minutes invested to keep them honed pays for itself instantly.
Testing Your Knife’s Sharpness
The paper test is easy, yet effective. Hold a sheet of paper at one edge. Attempt to cut it with the knife, pressing down on it and not moving at all back and forth. A sharp knife cuts cleanly. A knife that lacks sharpness either tears the paper or fails to cut at all.
Another test involves ripe tomatoes. The skin is very easy to cut with a sharp enough blade with little pressure. If you’re crushing it rather than cutting it, your knife is giving out on you.
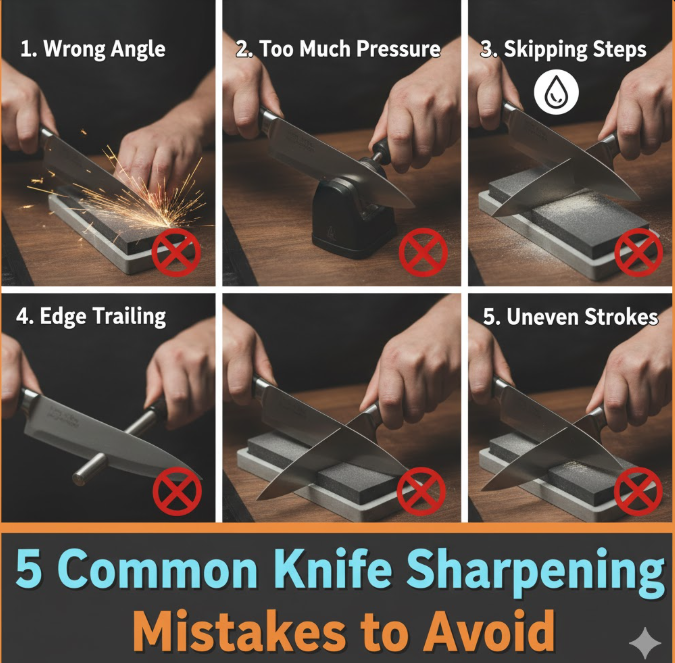
Common Mistakes to Avoid
When you sharpen, don’t apply too much pressure. Let what’s abrasive on the surface do the work. Too much pressure can ruin your blade or leave it with an inconsistent edge.
Keep your angle consistent. The sharpening angle changes when sharpening on both sides and so gives an uneven edge. If you don’t know for certain, select a conservative angle of 20 degrees for most kitchen knives.
Never sharpen on slippery surfaces. An accident may be caused upon a ceramic plate or mug being moved. Carry out all operations on stable, anti-slip surfaces.
When to Seek Help From a Professional
These knife sharpening tricks are great for normal upkeep. Severely damaged or very dull knives, though, may need professional help. Look for chips in the blade, bent tips or knives that no longer respond to home-sharpening methods.
The average cost for a professional knife sharpening service can range between $5-10 per blade. This is a smart investment to make once or twice a year for your most-used knives. Between professional sharpenings, put these home methods to work ensuring your blade stays sharp.
Some kitchen stores include free sharpenings when you buy knives from them. Find out when you buy a new blade. For more detailed information on proper knife care and maintenance techniques, Serious Eats offers an excellent guide on knife sharpening fundamentals.
The Real Advantages of Sharp Knives
In addition to safety and speed, sharp knives make cooking fun. The thrill is in cutting through ingredients with the greatest of ease. Your food will look better when cut, not crushed or torn.
Sharp knives lead to less hand fatigue as well. Your hands and wrists aren’t fatigued after long cooking sessions, because you don’t have to push down so hard with each cut. This is especially relevant for those with arthritis or other joint complaints.
Knife maintenance is on the list of basic skills to learn from professional chefs for a reason. These knife-sharpening hacks bring that professional standard to the home cook.
Concluding Your Sharp in the Kitchen Adventure
Now you have four useful, tried-and-true hacks at your disposal for keeping an edge on your knives amidst a busy schedule. No expensive equipment required. No complicated techniques to master. Only easy tricks with objects found in your home.
Begin according to whichever of the two methods appears easiest to you. Try the aluminum foil hack next time you meal prep. Grab a mug and sharpen your chef’s knife for three minutes. Every little bit adds to your confidence and skill level.
Please keep in mind that sharp knives are easier and safer to use, faster in the kitchen and fun to work with. These few minutes in knife sharpening hacks will change the way you cook every single time. Your ingredients will look nicer, your prep time will go down and your cooking experience will get better.
Make knife maintenance a habit as opposed to being a once every blue moon task. Your kitchen knives are indispensable tools that need the proper care. With these tricks, dulled ones will never trouble you again.
Frequently Asked Questions
How frequently should I be sharpening my kitchen knives?
For home cooks who cook or prepare meals on a daily basis, these types of light maintenance should occur weekly. For a little more in-depth sharpening, we recommend using ceramic methods approximately every two to four weeks. The timing is up to you, how much you cook and what kinds of foods you cut. With hard vegetables and frozen foods, blades will become dull much quicker than they would with softer produce.
Will using these methods harm my fancy knives?
If you follow them properly, these knife sharpening hacks are not dangerous to high-quality knives. The word of advice is to apply it with light to medium pressure, and keep consistent angles. Compared to electric sharpeners, these methods remove very little metal. But if you have a very expensive or specialized knife, then you may wish to seek professional care in order to retain warranty coverage.
Will these hacks work on serrated knives?
The aluminum foil method is also great for serrated knives. You just snip through the folded foil as pictured, and it has a sharpening effect on all those little teeth. The other techniques do not work well with serrated edges because they’re intended for straight blades. Serrated knives already tend to hold their edges longer than regular knives do.
At which angle should I hold my knife to sharpen?
For most kitchen knives, 20 degrees is fine. Imagine the angle of an opened-halfway matchbook — that’s about 20 degrees. Some Japanese knives prefer 15 degrees; heavy-duty knives might like 25 degrees. Don’t stress over exact measurements. These home techniques are more about consistency than accuracy.
Why can’t I make my knife any sharper through these means?
If you’re finding these at-home methods aren’t successful, your knife could be beyond basic maintenance because it’s too dull or damaged. If the edge is chippy, very nicked out, or extremely dull you should work something more aggressive. If you think the edge might be too damaged to resharpen, consider taking it in for professional sharpening, then come back and use these hacks to maintain it. Both, of course, assuming you’re not squeezing and that you have the right stroke with even angles.
Does the coffee mug trick actually work?
Yes is the answer – the ceramic ring on a coffee mug does have materials that are hard enough for steel to sharpen against. Professional chefs rely on this emergency technique when there are no proper tools at hand. It’s not going to deliver the same results as a top-of-the-line sharpening stone, but it does wonders for a dull blade. The important point is the character of the surface you use, which should be unglazed ceramic (because it is not glazed smooth).